|
|
|
|
|
 |
Performance Products for FWD
Chrysler, Dodge, Plymouth, Shelby |
|
|
|
|
|
|
| "Neon" ENGINE MOUNT INSERTS, 2000-2004 |
| Installation Instructions! |
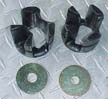 $29 Pair plus shipping $29 Pair plus shipping |
NOTE These inserts are identical and are designed for
the upper and lower engine mounts (torque struts) on the
passenger side of the engine. These mounts are to be
inserted into the mounts from the same side of the mount
as where the head of the motor mount bolt is.
|
Make sure the engine is properly supported when
removing and installing the motor mounts. |
|
|
TOP MOUNT
1) With the engine properly supported, remove the top motor mount from the car
according to the manufacturers service manual.
2) Using a hobby and/or utility knife, cut away the rubber flashing material that is
in the middle of the mount so that the insert can pass completely through mount.
3) Hand press the insert fully into the mount. The insert should now sit
flush against the center post of the mount.
4) Reinstall top mount according to the manufacturers service manual using
the supplied 1/2" ID washer contacting the insert at the bolt head side.
Torque to factory specifications.
LOWER MOUNT
1) With the engine properly supported on jack stands, remove the front passenger
side wheel.
2) Remove the plastic accessory belt splash shield to gain access to the lower mount.
3) With the engine properly supported, remove the bolt attaching the
lower motor mount to the engine.
4) With the lower mount still attached to the chassis, use a hobby and/or
utility knife to cut away the rubber flashing material that is in the middle of the mount
so that the insert can pass completely through the mount.
5) Hand press the insert fully into the mount. The mount should now sit
flush against the center post of the mount.
6) Re-install the lower motor mount bolt using the supplied 9/16" ID washer
contacting the insert at the bolt head side. Torque to factory specifications.
7) Re-install the plastic accessory belt splash shield.
|
|
|
